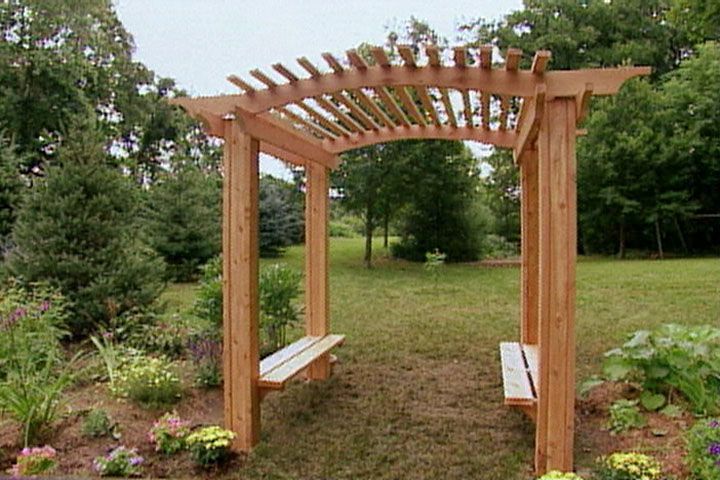
Build Your Own Garden Arbor: Elegant Entryways
An arbor is a charming architectural structure that serves as an attractive focal point and entranceway in many gardens and landscapes. Arbors provide a lovely accent while also offering practical benefits like shade and visual privacy. This article will provide tips on planning, designing, building, accessorizing, and maintaining your very own garden arbor.
We’ll cover key considerations like choosing locations, materials, and styles to match your needs and garden aesthetic. Step-by-step instructions will walk through constructing the base, adding structural and decorative elements, finishing, and installing accessories. Advice on upkeep and repair will help ensure your arbor remains beautiful over many years of use.
Garden arbors make for elegant, inviting entry points. By the end, you’ll have the knowledge to design and build your own customized arbor that provides beauty, function, and style to your landscape.
Planning Your Arbor
Planning ahead is crucial when designing and building a garden arbor. Considering the size, location and style you desire will ensure your arbor fits the space both aesthetically and functionally. Start by measuring the garden entrance or area where you plan to install the arbor. Having precise measurements of the length and width will allow you to design an arbor that fits the space perfectly.
Think about how tall you want the arbor to be. Standard height is often between 6 to 8 feet, allowing comfortable passage underneath. But you may prefer a shorter or taller arbor for visual impact. Also consider the overall size – do you want just a small ceremonial arch or a larger structure that makes a statement? Your measurements will help determine what dimensions work best.
Finally, decide what architectural style you would like. An arched roman style brings old world elegance while a gabled roof has a quaint cottage feel. Consider any existing structures your arbor should complement. Planning these key factors will ensure your DIY arbor project starts off on the right foot.
Choosing Materials
When selecting materials for your arbor, you’ll need to consider factors like budget, durability, and aesthetics. Some top choices include:
Wood
Wood is a classic arbor material. Cedar, redwood, and bamboo are naturally rot-resistant woods that can stand up well to outdoor conditions. Wood offers a natural, rustic look and is easy to decorate or customize. However, untreated wood will deteriorate faster and requires more maintenance like staining or sealing to protect it (source).
Metal
Wrought iron, aluminum, and steel arbors can provide an elegant, decorative statement. Metal is very durable, low maintenance, and weather-resistant. But it tends to be more expensive and can get hot in the sun (source).
Plastic/Vinyl
Plastic or vinyl arbors are affordable, low maintenance options. They hold up well to weather and won’t rot. But they don’t offer the natural beauty of wood. Plastic and vinyl can also become brittle and degrade over time with sun exposure.
Composite Materials
Composite and synthetic wood materials offer the look of real wood but with added durability and weather resistance. Composites like Trex don’t require staining or sealing. But they are typically more expensive than natural wood.
Arbor Designs
When designing your garden arbor, you’ll want to consider the overall shape and style that best fits your space. Arbors come in several classic architectural styles to choose from:
Arch
Arched arbors have an upside down U-shape and work well for marking a distinct entrance. The curved top is elegant and draws the eye upward, creating a focal point. Arch designs look beautiful decorated with flowering vines.
Gabled
Gabled arbors have a triangular top reminiscent of a house. This peaked roof shape provides a sense of shelter and intimacy while allowing you to walk underneath. Gabled arbors blend nicely into landscapes and complement cottage gardens.
Pergola
Pergola arbors have an open top with crossed beams overhead. This allows maximum sunlight and creates an airy, open feel. Pergolas often have side railings with trellises for climbing plants. They make lovely shaded sitting areas.
When it comes to materials, you can build your arbor from scratch to your own custom specifications. Or choose a prefabricated arbor kit made from wood, metal or vinyl. Prefab options provide an easy alternative, but building your own allows for complete customization.
Constructing the Base
The first step in building your arbor is constructing a sturdy base to support the structure. This involves digging holes for the posts and securing them firmly in place.
Use a post hole digger to dig holes approximately 2-3 feet deep and 10-12 inches wide, one hole for each post of your arbor. Space the holes apart at the width you want your arbor to span. Make sure the holes are dug below the frost line in your area to prevent shifting (source).
Insert your 4×4 or 6×6 posts into the holes. Make sure they are plumb and level using a spirit level. Fill the holes with concrete around the posts to secure them in place. Let the concrete fully cure for several days before moving on (source).
You may also opt to brace the posts with 2x4s attached to the sides of the posts using galvanized brackets. This provides additional stability.
Once your posts are firmly set, you have a sturdy base ready for installing the overhead structure of your arbor.
Adding Structural Elements
Two important structural elements for garden arbors are beams that span the top and reinforcing joints where pieces meet. Horizontal beams tied across the top of the arbor provide critical stability and support for any decorative elements added above.
According to Renaissance Garden Guy, “My arbor structure incorporates a vertical trellis component, as well as three vertical support posts, and horizontal support outriggers (girders), and the open lattice section.” The horizontal supports prevent sagging and bowing of the frame over time.
Properly reinforcing joints where vertical posts meet crossbeams also improves overall integrity. Using sturdy hardware like galvanized steel brackets and bolts at these connection points prevents loosening from wind or weight.
Renaissance Garden Guy recommends using notched beams that interlock with posts rather than just screwing or nailing crossbeams to the sides. This creates a stronger, longer-lasting joint.
Taking time to add robust horizontal supports and reinforce key joints results in an arbor that maintains structural integrity for years. This provides a solid base for decorative elements like climbing plants or lights.
Including Decorative Touches
Once your garden arbor structure is complete, you can add special decorative elements that complement the style and really make it shine. This is where you can customize the arbor and make it your own with creative accents. Here are some popular decorative options to consider adding:
Planters
Attaching planter boxes or pots to your arbor is a great way to incorporate lovely greenery. You can mount wooden boxes or metal baskets to the sides or top for trailing vines and overflowing flowers. Choose planters that match the arbor’s color and materials for a cohesive look. Herb planters also make a nice addition to infuse your arbor with lovely scents.
Lighting
For an arbor that shines day and night, install lighting along the top or woven throughout the beams. Options like pendant lights, lanterns, or fairy lights will not only illuminate your arbor, but also create a magical ambiance. Opt for solar lights to avoid the need for electrical work. Just be sure any lighting you use is rated for outdoor use.
Benches
An arbor is a natural spot to take a seat and relax. Add a bench or swinging bench inside to create a cozy resting spot. Look for garden benches made of weather-resistant materials like teak, metal or concrete. For extra comfort, outfit your bench with weatherproof cushions.
Privacy Panels or Curtains
If you want your arbor to provide additional privacy or protection from the sun, add removable curtain panels. Canvas, bamboo or rattan are good natural materials that allow airflow. You can tie the curtains back when not needed. Another option is affixing removable reed or bamboo fencing sections to create more enclosed walls when desired.
Getting creative with accessories like these can really make your DIY arbor stand out. Just be sure any additions are securely installed and built to withstand the elements. With the right details, your arbor can be both beautiful and functional for years to come.
Finishing and Protecting
Once your arbor framework is assembled, you’ll want to ensure it’s properly finished and protected from the elements. This is an important step that will help your DIY garden arbor last for years to come.
Start by sanding any rough edges and surfaces with medium to fine grit sandpaper. This will smooth everything out prior to finishing. For softer woods like cedar or pine, 120-150 grit sandpaper is ideal. Harder woods may require 80-100 grit for the initial sanding. Always sand in the direction of the wood grain to achieve the best results.
Sealing is the next step, which will protect the natural beauty of the wood. Use a high-quality exterior wood sealer, applying with a paintbrush or roller. Allow proper drying time between coats as indicated on the product instructions. Multiple thin coats are better than one thick coat when sealing.
Staining can provide extra protection while also adding color. Be sure to use an exterior grade stain and consider how the color will complement your garden design. Test samples on scraps first to ensure you get the desired color tones before staining the entire arbor. Apply stain shortly after sealing for best adherence.
For maximum weatherproofing, a marine spar varnish or polyurethane coating is recommended as a final step. This clear topcoat will provide UV and water protection. As with sealing, apply multiple thin layers allowing proper dry time between applications. With the right preparations and finishes, your handcrafted garden arbor can withstand years of outdoor exposure while maintaining its beauty.
Installing Accessories
A garden arbor can be enhanced with decorative accessories that add visual interest and sound. Popular accessories to hang or attach to your arbor include:
Hanging Baskets
Fill colorful hanging baskets with flowers or trailing greenery to create a cascade of color and texture along the sides of your arbor. Choose flowers and plants that will thrive in the sunlight exposure where your arbor is located. Use hanging hooks attached to the arbor roof to secure metal or wooden hanging baskets in place.
Wind Chimes
Add musical interest to your garden space by hanging wind chimes from the top or sides of your arbor. Opt for wind chimes made from durable materials like aluminum or bamboo that will withstand weather exposure. Position them where a breeze can cause them to chime gently.
Signs and Plaques
Decorative signs, address plaques or wall hangings can be affixed to the sides or top of your arbor as well. Opt for materials like metal or stone that complement the arbor. This allows you to add your home address, a family name sign, inspirational quote or decorative artwork.
With the right accessories, your garden arbor becomes a focal point filled with beauty, interest and personality. Change up accessories seasonally or for holidays to give your arbor curb appeal all year long.
Maintaining Your Arbor
An arbor will last for many years with proper maintenance. It’s important to periodically check for any signs of weathering, rot, or pest infestation. Look for cracks, peeling paint, mold, or sections where wood is soft or crumbly. Also inspect for evidence of termites, carpenter ants, or other insects (https://aluminumfencesdirect.net/blog/taking-care-of-your-vinyl-arbor/).
On an annual basis, tighten any loose joints and hardware. Sand and repaint any areas that are cracked or peeling. Apply a fresh coat of water sealant to protect the wood from moisture damage. Prune back any overgrown vines or foliage. Remove debris and cobwebs with a broom or vacuum (https://www.bestpickreports.com/blog/post/get-shady-arbor-installation-and-maintenance-tips/).
With routine upkeep, an arbor can stay structurally sound and beautiful for many years. Address any issues promptly to prevent further deterioration.