Build Your Own Garden Trellis: Support For Climbing Plants
A garden trellis is a structure made of wood, metal, or plastic that is placed against a wall or fence to support climbing plants. The purpose of a trellis is to provide a vertical structure for vines, flowering plants, and fruiting plants to grow on. Popular climbing plants that benefit from trellises include roses, clematis, jasmine, wisteria, and grapevines. Using a trellis allows these plants to grow vertically, saving space while creating beautiful displays of flowers, greenery, or fruit.
Trellises come in many different shapes and sizes. They can be simple wooden lattices or more ornate metal or PVC structures. Trellises provide support for vines to climb up vertically rather than sprawl over the ground. This provides visual interest and adds height and color to gardens and landscaping. Trellises can also help organize plants, define areas in a garden, provide privacy screening, and allow plants to grow on vertical spaces like fences and walls.
Materials Needed
The main materials needed to build a garden trellis are:
- Lumber, metal rods, or PVC pipes for the trellis structure. Cedar and redwood are good wood choices as they are naturally rot-resistant. Galvanized steel rods or aluminum pipes are good metal options.
- Hardware like screws, bolts, cable ties, eye hooks, turnbuckles, etc. to assemble the trellis pieces. Make sure hardware is weather/rust resistant.
- Garden twine, wire, or nylon netting to create a lattice for climbing plants to attach to. Galvanized steel wire or UV treated garden twine work well.
- Wood sealant or paint if using lumber, to protect it from weathering.
- Tools like a saw, drill, pliers, screwdriver, staple gun, etc. to construct the trellis.
The exact materials depend on whether you want to build a wooden, metal, or PVC pipe trellis. Opt for durable materials that can withstand outdoor weathering and support climbing plants.
Trellis Design Options
There are several classic trellis designs to consider for your garden. The shape and style you choose will depend on the look you want to achieve, the climbing plants you intend to grow, and the amount of space available.
Lean-to Trellis
A lean-to trellis features a vertical support on one end and poles that angle downwards towards the other end. This creates a single inclined plane for climbing plants to grow on. Lean-to trellises work well along fences or walls. They allow you to make use of vertical space while directing growth where you want it (Source).
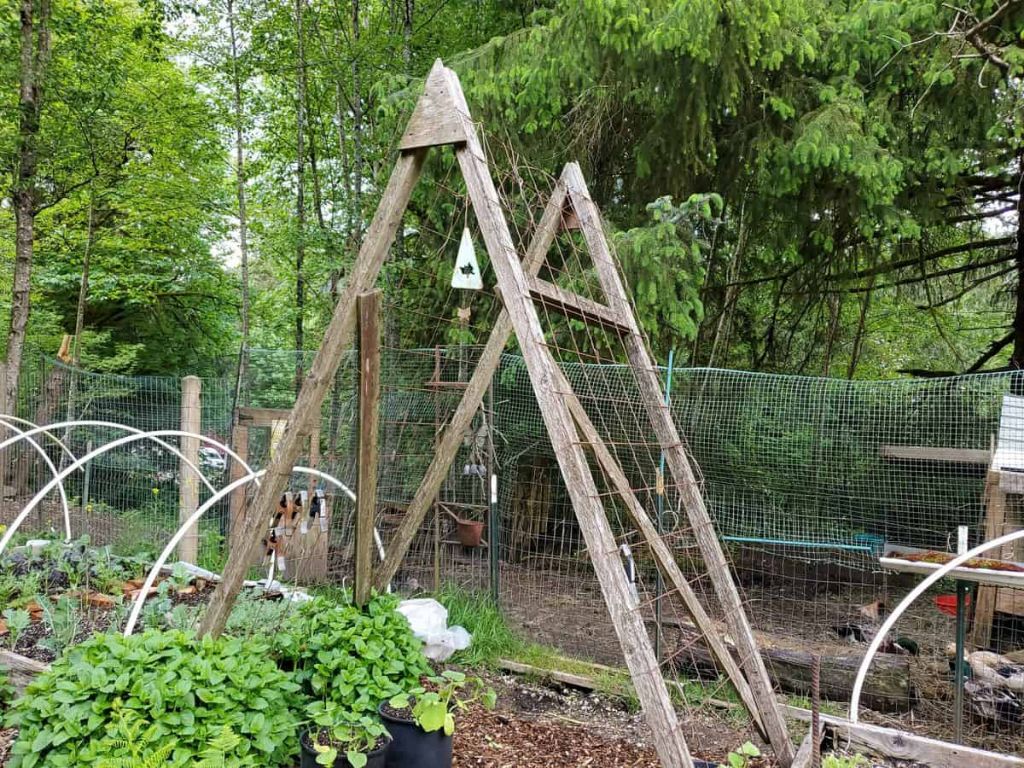
A-Frame Trellis
As the name suggests, an A-frame trellis consists of two panels that form a peaked roof shape, resembling a capital letter A. This style works well for defining a boundary or creating a gateway into a garden space. The angled panels provide plenty of surface area for climbers. A-frame trellises also add height and vertical interest (Source).
Obelisk Trellis
Obelisk trellises feature four or more poles that come together at a central point up top. This forms a tall, slender pyramid shape. Obelisks take up minimal ground space while still offering height for climbing plants. They create a striking vertical accent in flower beds or pots. Obelisks can stand alone or be incorporated into sections of a larger trellis (Source).
Two or Three Pole Trellis
One of the simplest trellis designs consists of two or three vertical poles connected by horizontal crossbeams. The poles can be various heights and widths to suit your needs. This pared-down style is easy to construct from basic lumber or PVC pipe. It also leaves lots of open spaces for sunlight and air circulation.
Wall-Mounted Trellis
Wall-mounted trellises affix directly to a vertical surface like a fence or exterior wall. They can cover large sections or small targeted areas. This style adds ornamentation and growing space without taking up valuable yard real estate. It also prevents climbing plants from attaching directly to your walls.
Measuring and Planning
When building a DIY garden trellis, the first step is taking some key measurements of the area where you want to install it. You’ll need the height, width, and depth of the space to determine the optimal size and shape for the trellis. Measure the area twice to ensure accuracy.
Take measurements of the climbing plants as well. The trellis should be sized to properly support the vines, flowers or vegetables you want to grow. Taller trellises may be needed for fast-growing vines like grape ivy or trumpet vines. Bushy plants like blackberries may require a wider trellis.
Also consider sunlight access. Ideally the trellis will allow maximum sunlight to reach your climbing plants. Take note of any shady spots or obstructions from trees, structures or fences. Position the trellis to avoid too much shade.
Before building, sketch out some design options showing the trellis placement and size. This will help visualize how the trellis will fit the space. Refine the dimensions in your sketch before purchasing materials. Planning ahead will ensure your DIY garden trellis is sized right and optimally positioned.
Building a Wooden Trellis
A wooden trellis is a classic choice for supporting climbing plants in the garden. Here are the steps for constructing your own customized wooden trellis:
First, cut lumber pieces to size according to your planned design. Cedar, redwood, or pine boards are good choices for outdoor use. Cut the boards into posts, crossbars, lattices, and other needed pieces. Be sure to measure twice and cut once to get all the components ready.
Next, drill pilot holes at intersections where you’ll attach the pieces together. The pilot holes prevent the wood from splitting. Use a drill bit slightly smaller than your screws.
Then assemble the pieces using exterior-rated screws or bolts. Attach the vertical posts first. Then add horizontal crossbars, diagonal bracing, and any decorative latticework for plant support. Use a square and level to ensure the trellis is stable.
Finally, apply an outdoor sealant or wood stain. This protects the wood from weathering and adds color. Let the trellis cure before installing in the garden.
Building a Metal Trellis
Metal is a sturdy and long-lasting material for building a garden trellis. There are several options when it comes to the type of metal, such as iron, aluminum, or galvanized steel. The metal can be purchased as poles, tubing, or lattice panels.
To construct a metal trellis from scratch, you’ll need to cut metal poles or tubing to the desired lengths using a hacksaw or other cutting tool. Wear protective gear when cutting metal to avoid injury. Plan out the trellis design first to determine the required lengths of metal pieces.
Connect the cut metal pieces together using metal brackets, bolts, screws, or other hardware. Drilling pilot holes will make inserting screws easier. Position the metal uprights and cross pieces according to your planned trellis design and attach securely.
Once constructed, the metal trellis frame will need to be securely attached to a wall, fence, or posts concreted into the ground for stability. Use appropriate hardware like wall anchors, fence staples, or pole brackets to firmly fix the trellis in place.
Metal trellises are low maintenance but may eventually need repainting. Use exterior grade paint to prevent rusting and deterioration over time. Properly installed, a DIY metal trellis can last for many years in the garden.
For more information see: https://mytrellisworks.tumblr.com/
Building a PVC Pipe Trellis
Using PVC pipes is a lightweight and inexpensive way to build a trellis. Here are the steps for constructing a PVC trellis:
First, cut your PVC pipes to the desired length using a handsaw or power saw. Typical lengths are between 6-10 feet. You’ll need two pipes for the vertical supports and several shorter horizontal crossbars.
Next, use PVC elbow and T connectors to join the pipes together. Slide the ends of the perpendicular pipes into the connectors and make sure they fit snugly.1
To secure the PVC pipe joints, you can use PVC cement, which chemically fuses the pieces together. Alternatively, drill pilot holes and use zip ties, rubber grommets or metal braces to firmly fasten each joint.
Once the frame is constructed, anchor the vertical support pipes firmly into the ground or secure them to a fence or wall. The trellis should be sturdy enough to withstand wind and bear the weight of mature vines.
PVC pipe trellises provide great support for climbing vines and plants. Make sure to check the trellis periodically and refasten any loose joints to keep it upright and intact.
Finishing Touches
Once your trellis frame is built, there are many ways to add decorative touches and functionality.
You can decorate the trellis with lattice, netting, or rope for aesthetic appeal. Cut lattice into shapes or patterns for a unique look. Use jute or sisal rope to wrap portions of the trellis. Garden netting adds texture while also supporting climbers and vines.
Attach planter boxes or plant hooks along the trellis to hold potted plants. This allows you to mix flowering annuals with perennial climbers on the same structure. Pick planters and hooks that match the trellis style and materials.
For mobility, consider adding wheels or casters to the base of a freestanding trellis. This allows you to move it around the garden as needed. Locking wheels will keep it stationary once positioned.
With the right added embellishments, your diy trellis can be both functional for plants and a beautiful focal point in the garden. Get creative with finishes to make it your own. Source
Installing & Caring for Your Trellis
Proper installation and care will ensure your trellis provides sturdy, lasting support for climbing plants for years to come. Choose a sunny location to install your trellis near the climbing plants it will support. Leave at least 12 inches of space between the bottom of the trellis frame and the ground, according to wikiHow.
Gently train the vines of climbing plants onto the trellis. Tie them loosely in place as needed with plant ties or twine. Avoid overcrowding the trellis with too many vines to prevent excess weight and stress on the structure. Prune back rampant growth as required to keep the plants and trellis looking tidy. Pruning encourages bushier new growth while allowing airflow and light penetration.
Periodically check for loose joints or posts on freestanding trellises and make repairs as needed. Re-stain or seal wood trellises every 1-2 years to protect against weathering. Proper installation combined with attentive care will lead to seasons of enjoyment from a handsome, plant-filled trellis.
Inspiring Examples
A beautiful trellis can transform your garden into a magical wonderland. Here are some inspiring examples of trellises used in creative ways to support climbing plants.
This rustic wooden trellis made from bamboo poles provides both form and function. The crisscross design gives the sweet pea vines ample support while adding visual interest. The natural wood blends perfectly into the lush green garden.

A metal trellis archway makes a gorgeous entryway into this backyard oasis. The sturdy iron design is the perfect frame for the pink climbing roses to gracefully wind their way up. The blooms cascading down create a stunning floral display.

An ornate metal trellis transforms a blank wall into an elegant vertical garden. The whimsical twisting vines and bursts of colorful flowers stand out beautifully against the black metal backdrop. It’s a living work of art.

This DIY PVC pipe trellis provides excellent support for these prolific cucumber vines. The simple and inexpensive trellis design allows ample sunlight and airflow while keeping the fruits up off the ground. A perfect veggie garden solution.