Build Your Own Garden Swing: Relaxing Outdoor Seating
A garden swing set can create an inviting, relaxing oasis right in your own backyard. Building your own custom swing set allows you to design it exactly how you envision to perfectly suit your space and needs. With a DIY garden swing, you can relax outdoors while still remaining close to home. This guide will walk through the entire process of constructing your own garden swing, from choosing a location and selecting materials to assembling the swing set and adding plush cushions to create a comfortable place to unwind.
Choosing a Location
When deciding where to place your garden swing, the most important factor is sunlight versus shade. According to Garden Swing Ideas for Summer Enjoyment, you’ll want to consider if you prefer to relax in the sun or cool shade. Positioning the swing in a sunny spot will allow you to soak up the warmth, while a shady location offers relief from the heat.
If opting for a sunny locale, aim for an open area of the yard that receives sunlight for much of the day. Just be sure to add a canopy or umbrella to provide intermittent shade. For a shady swing setting, look for placement under or near trees. A covered porch or gazebo also offers built-in shade. Ultimately the choice comes down to personal preference and comfort.
Selecting Materials
Choosing the right materials is crucial for building a sturdy and long-lasting garden swing. The three main components are the type of wood, hardware, and fabric/cushions.
For the swing frame and supports, cedar and cypress are excellent choices. Cedar has natural rot resistance and a beautiful look, though it may need protective coating for longevity. Cypress also withstands weather well. These softwoods are ideal because they are lightweight yet strong (Source).
Use galvanized or stainless steel hardware forassembly. Screws, bolts, hinges, and chains exposed to the elements need rust protection. Choose hardware rated for outdoor use with the proper weight load capacity.
The fabric should be weather-resistant and breathable. Outdoor canvas or Sunbrella fabrics are good options. For cushions, polyester fiber with waterproof covers will hold up over time. Make sure the fabric and cushions can be easily detached for cleaning and seasonal storage.
Tools Needed
Building your own garden swing will require some basic tools that most DIYers likely already have on hand. The main tools you’ll need include:
- Saw – A jigsaw or handsaw will be needed to cut the wood to size for the swing frame.
- Drill – Both a power drill and drill bits are necessary for assembling the swing with screws.
- Screwdriver – Use a Phillips head screwdriver to drive the screws into the wood.
- Hammer – A hammer helps drive nails and taps pieces into place.
- Tape measure – Taking precise measurements is crucial, so have a tape measure on hand.
With these basic tools gathered, you’ll be ready to start building. Having an extra set of hands can also be useful during assembly. Now let’s get to work constructing a relaxing new place to unwind in your backyard oasis!
Design Inspiration
When building your own garden swing, there are many design styles to consider. Going for a traditional look? Opt for an all-wood frame with curved armrests. For modern flair, try a sleek metal frame with clean lines and minimalist details. Or create a cozy rustic feel with a frame made from reclaimed wood and galvanized hardware (Source).
Think about the overall aesthetic you want for your outdoor space. An ornate Victorian garden lends itself to an intricate wooden swing with decorative carvings. Meanwhile, a contemporary backyard may call for a swing made from galvanized piping or aircraft cable. Don’t be afraid to get creative and make the swing uniquely yours!
Cutting the Wood
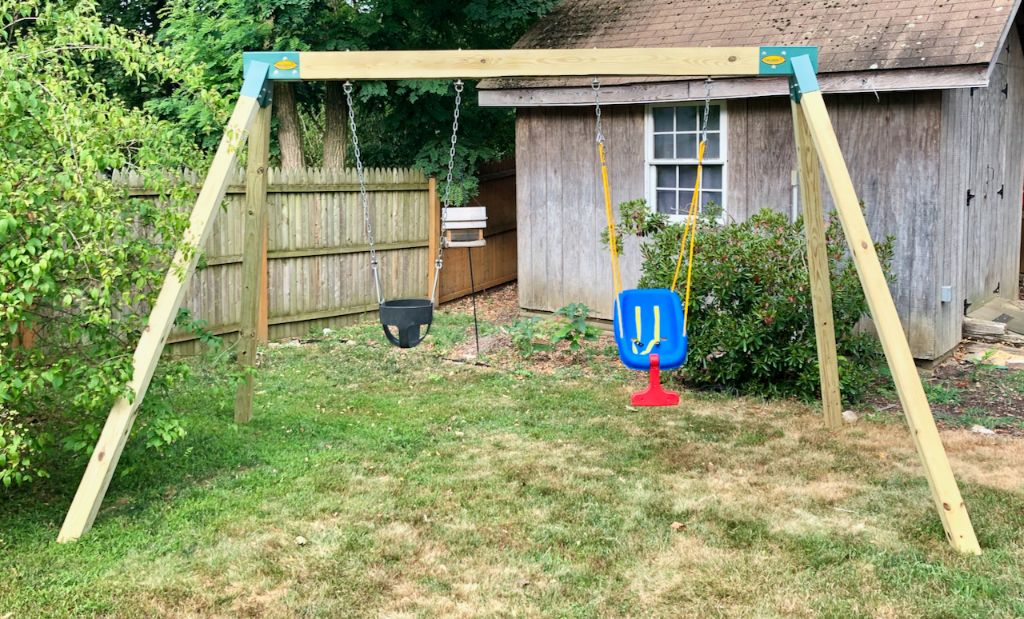
Once you have your materials and tools prepared, it’s time to start cutting the wood for the swing frame. Measure and mark your wood carefully according to the dimensions in your plans. For example, a typical A-frame design requires two 6-8 foot 4×4 posts and a 6-8 foot 4×6 beam.
Safety should be your top priority when operating power tools like a circular saw. Be sure to wear safety goggles, gloves, and ear protection. Only cut wood on a flat, stable surface and keep your fingers well away from the blade. Make slow, smooth cuts and avoid binding the blade in the wood. You may want to clamp a straightedge to the 4x4s and 4×6 to ensure straight cuts.
Take your time and don’t rush the cutting process. Measure twice and cut once as the saying goes! Smoother, more accurate cuts will result in a safer, better looking finished swing.
Assembling the Frame
Once you have all of the wood cut to size, it’s time to assemble the frame. This is one of the most important steps, as the strength of your swing will depend on sturdy joinery.
For the joints, you’ll want to use a basic butt joint secured with exterior wood screws. Drill pilot holes before adding the screws to prevent the wood from splitting. Use at least 3-4 screws per joint for maximum stability.
Position the legs and supports according to your plans and clamp or hold them in place as you attach. Make sure the frame is square by measuring the diagonals – they should be equal. Having a squared frame will ensure your seat hangs evenly.
In terms of hardware, galvanized bolts and washers are recommended for securing the swing hangers to the frame. The galvanization prevents rusting. Mark the locations for your hardware based on your plans and drill pilot holes before securing.
Take your time assembling the frame and double check your work. Precise joinery and hardware placement are imperative to creating a swing that will be safe and built to last.
Adding Cushions
One of the secrets to making your garden swing ultra-comfortable is adding plush cushions. While you can purchase ready-made cushions, it’s usually much more affordable to make them yourself. Plus, it allows you to customize the fabric and shape perfectly for your swing.
Start by taking measurements of the seat area and deciding on the cushion thickness you want. About 4-6 inches thick is ideal for a cozy outdoor swing cushion. Purchase your fabric and foam/stuffing materials accordingly.
Cut the foam to size using an electric knife or serrated blade. Then cut your fabric, leaving a couple extra inches on each side for seams. Place the foam on top and fold the fabric corners up around it. Use a staple gun to temporarily secure the fabric to the bottom side of the foam.
Sew the edges together using a tight zigzag stitch, removing staples as you go. Make sure to leave an opening so you can insert filler stuffing. Stuff firmly with poly-fill, foam scraps or other cushion stuffing. Hand stitch the opening closed.
Attach ties or velcro to the back side so the cushion stays securely on the swing seat. Add any additional trim or ties to further customize and decorate your new cushion!
Installing the Swing
Properly installing your new garden swing is crucial for safety and enjoyment. There are a few key steps when it comes to hanging and stabilizing your swing.
First, determine the best location for installing the swing. Consider accessibility, sunlight, and views when choosing your spot. Make sure there are no overhanging obstacles in the path of the swing.
Once you’ve selected the location, you’ll need to securely hang the swing. There are a few options for hanging:
You can use sturdy chains attached to eye bolts screwed into ceiling joists or beams. Space the chains equal distance apart for stability.
Or you can use rope threaded through the seat frame and tied off to sturdy hooks. Make sure the rope is thick and weather-resistant.
Install the chains or ropes so the swing hangs at a comfortable height, typically around 18-24 inches from the ground to the bottom of the seat.
It’s also important to stabilize the swing to prevent it from twisting or tipping. Attach eye bolts to the sides of the swing frame. Connect short chains from the eye bolts to anchors screwed into the ceiling or poles on either side.
Carefully test the swing once it’s installed by gently rocking it back and forth. Make any needed adjustments before enjoying your new relaxing oasis!
Enjoy Your Oasis!
After all the hard work constructing your garden swing, it’s time to sit back, relax, and enjoy your new oasis. Place some plush cushions on the swing to maximize comfort. Then grab a cool drink, your favorite book, and get ready to unwind. The gentle rocking motion of the swing is soothing and meditative.
Your new swing also creates a fun gathering place to socialize. Invite a few friends over on a sunny afternoon for laughs and great conversation. Serve some iced tea or lemonade and enjoy the shade. Kids will love playing on the swing too. Supervise younger children and teach them how to safely use the swing.
With your sturdy, hand-crafted swing, you’ll have a peaceful spot to escape the stresses of everyday life. Listening to birds chirping and the wind rustling through the trees never felt so good. Let your new swing become your happy place this summer and beyond. According to this article, “Swinging under a big shady tree is a great way to cool off, and I’ll bet you’ve got the perfect spot in your yard to enjoy this simple pleasure.” So get swinging and make the most of your backyard oasis!