Comprehensive Guide To Caring For Swiss Cheese Plants (Monstera Adansonii)
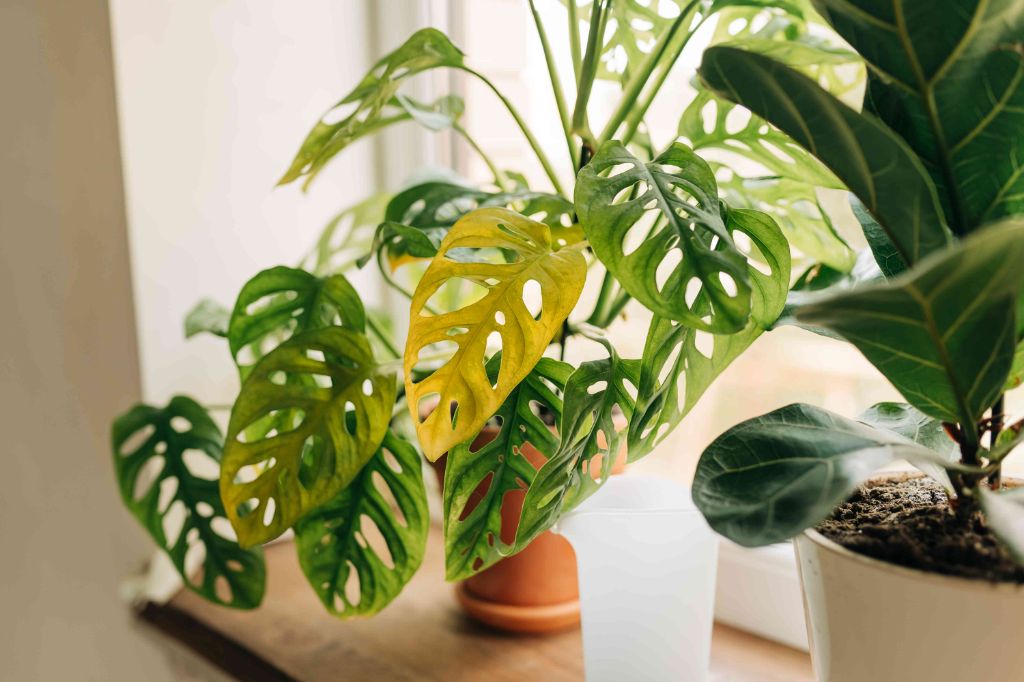
Monstera adansonii, also known as the Swiss cheese plant, is a popular houseplant native to Central and South America. It gets its common name from the unique holes or fenestrations that develop in the leaves as the plant matures.
The Swiss cheese plant is a fast-growing, evergreen vine that can reach up to 20 feet (6 m) long in its native jungle habitat. It has heart-shaped, glossy, leathery leaves that grow up to 8 inches (20 cm) long. Young leaves start out as full and round, developing the split leaf appearance as they mature.
This striking plant has been cultivated around the world since the Victorian era. While its exact origins are unclear, Monstera adansonii is believed to come from the tropical forests of southern Mexico, down through Panama and parts of South America.
Introduction
Ideal Growing Conditions
Swiss cheese plants thrive in warm, humid environments and do best in temperatures between 60-85°F. They prefer moderate to bright indirect light. Direct sunlight can scorch the leaves, so it’s best to place them near a bright window where they will receive a few hours of morning or late afternoon sun. The plants enjoy high humidity, similar to a tropical rainforest. Ideal indoor humidity levels are 40-50%. Misting the leaves or using a humidifier can help raise humidity around the plant.
Outdoors, Swiss cheese plants grow best in partial shade, protected from hot midday sun. Provide dappled sunlight filtered through trees. They can tolerate more direct light when grown outside in zones 10-12, but should still have some shade during the hottest parts of the day. Temperatures below 50°F can damage the plant.
Soil
Monstera adansonii thrive in a well-draining and aerated potting mix. The ideal soil will retain some moisture but also allow excess water to drain away readily. Some good options include:
- A mix of 1/2 potting soil and 1/2 orchid bark or coco chips for drainage (https://www.joyusgarden.com/monstera-adansonii-repotting/)
- 3/4 potting soil mixed with 1/4 pumice or perlite
- 1/2 potting soil and 1/2 coco fiber or peat moss
An aroid potting mix amended with charcoal and perlite provides the perfect balance of moisture retention and drainage that Monsteras prefer. The soil should be loose and fluffy, not compacted. Aim for a slightly acidic soil pH around 5.5-6.5.
Watering
Monstera adansonii prefers a moist but not soggy soil. Water when the top inch of soil feels dry to the touch. The frequency depends on factors like pot size, plant size, sunlight exposure, and temperature. In general, water about once a week or when soil is partly dry during the growing season and reduce in winter.
These plants need more frequent watering in brighter light. Water enough so that water flows freely from drainage holes at the bottom of the pot. Allow excess water to drain fully. Yellowing leaves that feel soft or roots emerging from drainage holes can indicate overwatering. Brown, crispy leaves often signal underwatering.
Monitor moisture levels with your finger. Check 1-2 inches below the surface before watering again. Reduce watering in winter when growth slows but don’t allow soil to dry out completely.
Fertilizing
Monstera adansonii benefits from fertilizer during the growing season to promote healthy growth. According to Savvy Gardening, an organic granular fertilizer or slow-release fertilizer formulated for foliage plants can be applied once every 6 weeks from early spring to late summer [1]. The fertilizer should be diluted to half strength before applying. Geeky Greenhouse recommends DynaGro Foliage Pro 9-3-6 as an excellent fertilizer for Monstera adansonii. This balanced fertilizer provides key nutrients like nitrogen, phosphorus, and potassium. It can be diluted to 1/4 strength and applied monthly during the growing season [2].
When fertilizing, it’s important to only fertilize when the soil is moist, and rinse any fertilizer off the leaves to avoid leaf burn. A general rule is to fertilize lightly and frequently, around every 4-6 weeks during the growing season. This provides a constant supply of nutrients. Over-fertilizing can damage the roots and leaves.
When and How to Prune
Pruning Monstera adansonii periodically helps maintain its shape and appearance. Pruning should be done in spring, as this allows the plant time to heal and grow again before winter. The ideal time is between February and April.
Start by carefully inspecting the plant for any dead, damaged, or diseased foliage and stems. Remove these with clean, sterilized pruning shears. Make cuts as close to the base of the stem as possible.1
Next, prune any leaves that are yellowing or getting too large for the space. Pruning encourages new growth, so monitor where you’d like fuller growth and prune back stems in other areas.
Finally, neatly trim any excessively long vines or leggy growth to maintain the desired size and shape. Remove any growth beyond what’s needed to fill its support structure.
Disinfect pruning shears after each cut. Avoid pruning more than 20% of the plant at one time to prevent shock.
Propagation
Monstera adansonii can be easily propagated from stem cuttings in either water or soil. The best time to propagate is during the growing season in spring and summer. Here are the steps for propagating in water or soil:
To propagate in water:
- Use a clean, sharp knife or garden shears to take 5-6 inch stem cuttings below a leaf node. Remove the bottom leaves.
- Place the cuttings in a jar of room temperature water. Make sure the water covers the node but not the leaves.
- Place the jar in a spot with bright, indirect light. Change the water weekly.
- Roots and new growth will emerge in 4-8 weeks. Once roots are 1-2 inches long the cutting can be potted up.
To propagate in soil:
- Take stem cuttings as above.
- Dip the cut end in rooting hormone powder to encourage root growth.
- Plant in a well-draining potting mix, keeping the soil moist but not soggy.
- Cover with a plastic bag to create humidity and place in indirect light.
- Remove the bag once new growth emerges in 2-3 months. Water when the top inch of soil dries out.
Mist the cuttings daily, keep out of direct sun, and after a few months new baby Swiss cheese plants will be rooted and ready to pot up!
Repotting
Repotting Monstera adansonii is recommended every 1-2 years in the spring or summer when the plant becomes root bound (according to Green Rooms Market). When repotting, move the plant to a pot that is only 2-4 inches larger than the current pot. Select a pot with drainage holes and use a well-draining potting mix made for tropical plants.
To repot, gently remove the plant from its current pot and loosen any circled roots at the bottom. Place some of the potting mix in the new larger pot and set the plant inside. Fill in around the plant with more fresh potting mix, ensuring the base of the stems are buried in the soil. Firm the soil lightly and water thoroughly after repotting.
Tips for repotting Monstera adansonii:
- Wear gloves when repotting to avoid skin irritation from the sap.
- Trim any excessively long roots or damaged roots before repotting.
- Provide a moss pole or plant stake for the vines to climb when repotting.
- Allow the plant to recover in a shady spot for a few days after repotting.
Pests and Diseases
Swiss cheese plants like Monstera adansonii are prone to several common pests and diseases. Knowing what to look for and how to treat infestations is key to keeping your plant healthy.
Some of the most common pests that affect Monstera adansonii include:
- Spider mites – These tiny pests suck nutrients and moisture from the leaves, causing stippling, discoloration and even leaf loss. Treat with insecticidal soap or neem oil. Wipe leaves down with a damp cloth regularly to prevent buildup.
- Mealybugs – Cottony masses on stems and leaves indicate a mealybug infestation. These sap-sucking insects stunt plant growth. Remove manually and use alcohol on a q-tip to kill. Insecticidal soap also helps.
- Scale – Hard bumps on the stems and leaves can be scale. They drain plant juices. Prune affected parts. Use horticultural oils or insecticidal soaps.
Common diseases include:
- Bacterial leaf spot – Causes yellow spots with tan centers on leaves. Prune affected leaves. Disinfect tools between uses. Water at soil level to avoid spread.
- Root rot – Caused by overwatering, it leads to stunted growth, yellow leaves, and root decay. Improve drainage and avoid overwatering.
- Anthracnose – Produces brown splotches on leaves and stems. Prune affected parts. Disinfect tools. Apply fungicide.
The best prevention is providing proper growing conditions, avoiding overwatering, inspecting plants regularly, isolating new plants, and cleaning tools between uses.
Toxicity
Swiss cheese plants contain insoluble calcium oxalates that are toxic to both humans and pets if ingested (1). All parts of the monstera adansonii plant are considered toxic, including the leaves, stems, and roots. The toxic compounds cause a burning sensation in the mouth and irritation if ingested (2).
Pets that chew on or ingest parts of a swiss cheese plant may show symptoms like excessive drooling, vomiting, difficulty swallowing, mouth pain, and swelling of the lips, tongue, throat, and mouth (3). If a pet is suspected of ingesting any part of a monstera adansonii plant, seek veterinary care immediately.
To keep children and pets safe, it’s important to place swiss cheese plants somewhere out of reach. Be sure to check for fallen leaves and stem pieces on the floor. Monitor pets when introducing new plants to the home to prevent chewing or ingestion.
(1) https://edis.ifas.ufl.edu/publication/EP639
(2) https://monsteraplantresource.com/are-monsteras-toxic-to-cats/
(3) https://plantophiles.com/plant-care/is-monstera-adansonii-toxic-read-this/